Prepping Your Guitar for Recording
Prepping Your Guitar for Recording is the difference between fighting noise and pitch in post and capturing takes that drop into a mix cleanly. This step by step guide gives you a reliable checklist you can follow before every session so your tone records consistently, edits quickly, and translates across monitoring. You will learn practical [...]
Prepping Your Guitar for Recording is the difference between fighting noise and pitch in post and capturing takes that drop into a mix cleanly. This step by step guide gives you a reliable checklist you can follow before every session so your tone records consistently, edits quickly, and translates across monitoring. You will learn practical ranges for relief, action, pickup height and DI level, plus a simple workflow for intonation, tremolo stabilisation, and noise control that saves hours later.
Why preparation beats fixing in the mix
Guitars are mechanical systems. Tiny shifts in neck relief, nut height, saddle position, and pickup clearance create audible changes in pitch, transient attack, and noise. When those variables are stable, your takes comp faster, re-amp cleaner, and respond predictably to compression and drive. Preparation is not glam, but it is the highest ROI work you can do before red light time.
If you want a quick primer on the part that keeps the neck playing correctly under string tension, skim this overview of the truss rod. For pitch accuracy across the fretboard, intonation basics matter too: see intonation on guitars. Both topics inform the ranges below and help you diagnose outliers quickly.
Fresh strings and stable tuning come first
- Choose the right gauge for the tuning: Keep similar feel to your rehearsal setup. If you tune down, a heavier set preserves tension and keeps bends in control.
- Restring methodically: Clip old strings, clean the fingerboard, install one string at a time so the nut never runs unloaded.
- Wind neatly: 2 to 3 wraps on wound strings and 3 to 5 on plain strings give solid grip without stacking friction.
- Stretch, retune, repeat: Gently pull each string along its length, then retune. Do two or three passes until tuning stops drifting after firm vibrato.
Neck relief and action for controlled attack
Relief lets the string vibrate without rattling. Too little and you get sitar buzz under hard picking. Too much and fretting feels slow and pitch suffers. Aim for a small forward bow measured with a capo at the first fret and your fretting hand at the last fret.
- Typical relief: around 0.10 to 0.30 mm measured at the 7th to 9th fret (feeler gauge between the top of fret and bottom of string).
- Action at the 12th: treble E around 1.2 to 1.8 mm, bass E around 1.6 to 2.2 mm for modern metal rhythm clarity. Raise slightly if your picking is particularly aggressive.
- Check relief again after action changes. The system is interactive, so iterate calmly rather than chasing perfection in one pass.
Prepare your instrument before you hit record
This is your quick checkpoint: confirm fresh, stretched strings, set relief in the 0.10 to 0.30 mm window, set action to the working range, and strum whole chord shapes at rehearsal volume to ensure no rattles or choked notes. If you need a rapid once over before you track, professional guitar DI cleaning and tightening keeps your takes consistent and mix ready.
Nut, saddle and intonation for trustworthy pitch
Nut slots that are too high cause sharp notes in the first few frets and make wide interval riffs sound tense. Slots that are too low create open string buzz. Once relief and action are set, intonate at the bridge so octave notes match their open string reference.
- Nut check: Fret at the third fret and observe the gap over the first fret. A paper thin space is fine. If you can press the string down a long way to touch the first fret, the slot is likely high.
- Intonation process: Tune open, compare the 12th fret fretted note to the open pitch, adjust saddle position, retune, repeat. Do this on new strings after stretching.
- Play test: Check octaves and fifths across positions to confirm that chords feel calm rather than sour.
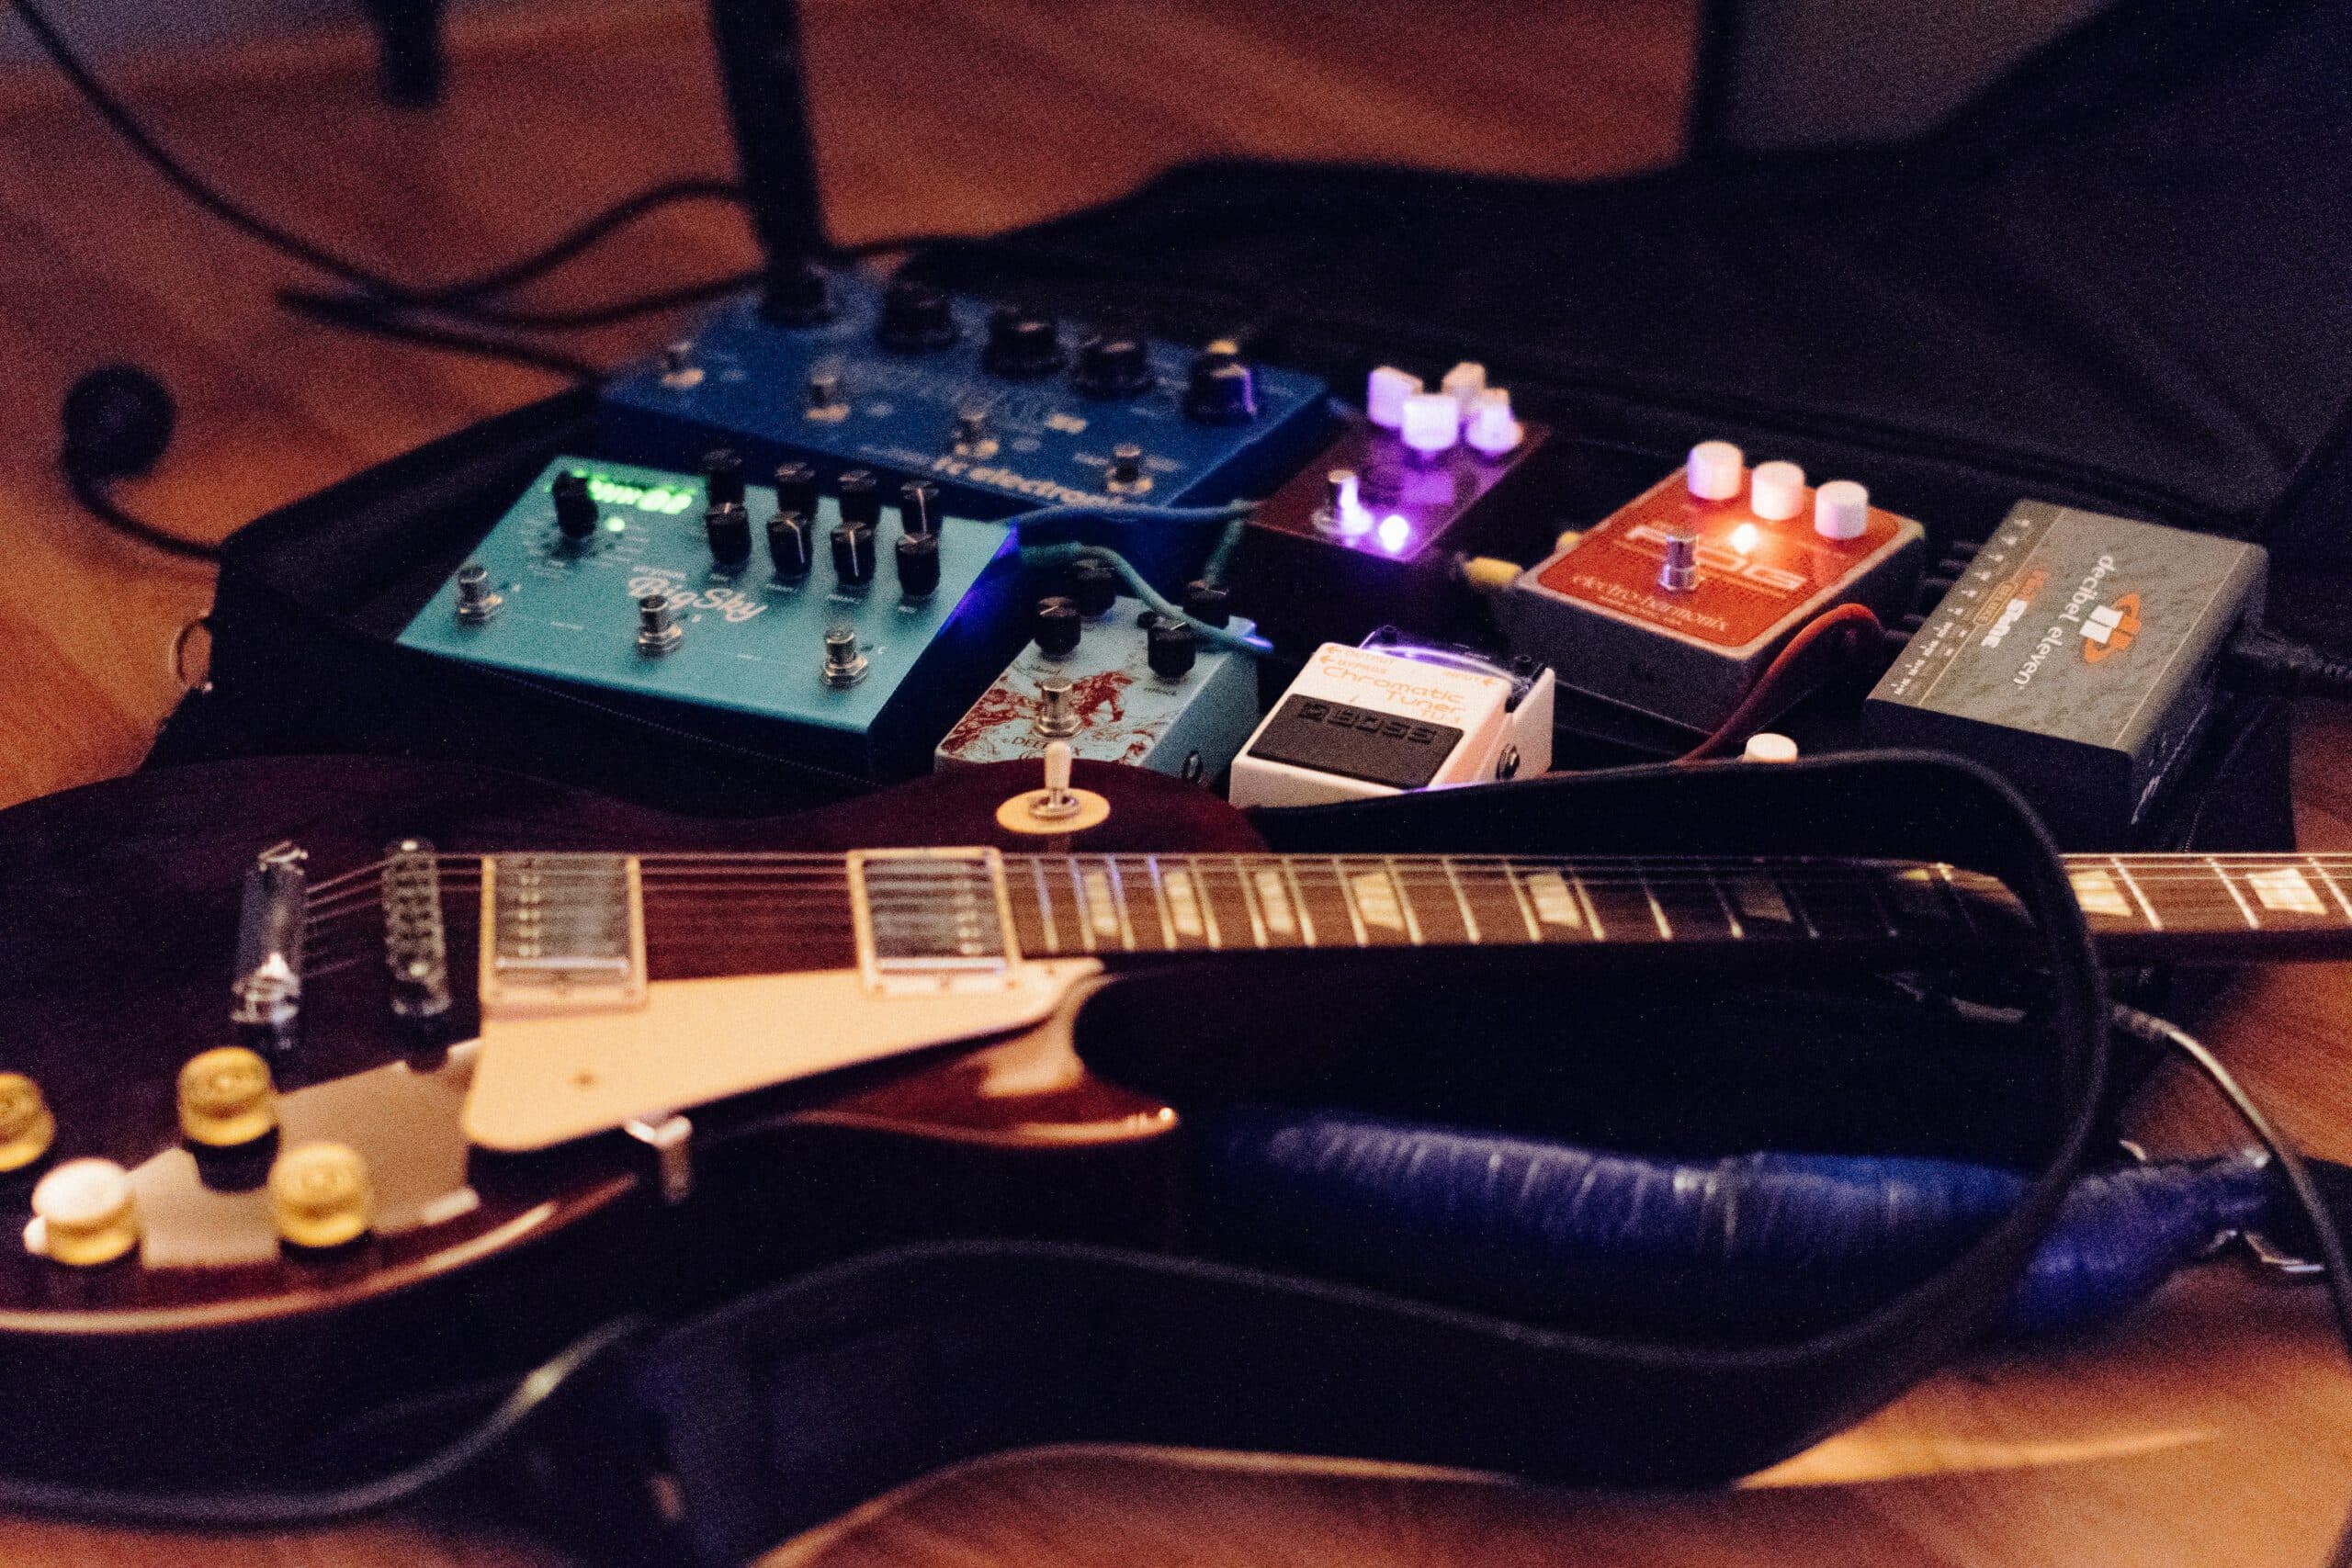
Pickup height and balance for clarity and punch
Pickups set too close can pull strings sharp and exaggerate pick noise. Too far and the guitar feels lifeless. Start with a controlled baseline then adjust by ear in context with drums.
- Baseline heights: with the string pressed to the last fret, aim for roughly 1.5 to 2.5 mm clearance on the treble side and 2.0 to 3.0 mm on the bass side, then fine tune for attack and sustain.
- Balance positions: Match neck and bridge outputs so level changes do not distort your interface. Use pickup pole pieces to even string to string differences if your model allows it.
- Noise check: Rotate your body and the guitar to find the quietest orientation. Single coils can benefit from strategic angle relative to screens and lights.
Tremolo systems and tuning stability
Floating bridges add expressive range but demand careful equilibrium. Decide if you need full float, decked movement, or hard tail behaviour for the session. Balance spring tension against string pull and lubricate all points of friction lightly.
- Bridge angle: Set the baseplate parallel to the body if floating. If you deck it, ensure the plate sits firmly on the body with no partial contact.
- Nut and saddles: A tiny smear of suitable lubricant in nut slots and on saddle contact points reduces binding. Retune, dive and pull up a few times, then retune again.
- String trees and locking hardware: Confirm screws are snug and clamping surfaces are clean. Replace worn parts before a serious session.
Silencing buzz, hum and ground issues
Nothing kills a tight rhythm take faster than a noisy floor. Before you mic cabs or print DIs, remove avoidable noise sources and verify that your guitar electronics behave predictably.
- Electronics health: Rotate pots through their travel. Scratchy or intermittent behaviour signals dirt or wear. Selector switches should click reliably without dropouts.
- Cable integrity: Use known good, short cables for DIs. Wiggle the plug at the jack gently to check for crackles that indicate a loose connection.
- Ground loops: If you hear a persistent low hum that changes when you touch metal parts, learn the basics of a ground loop and keep the recording rig on a sensible power scheme. Never lift safety earth on mains devices.
- Environment pass: Dimmer switches, neon signs, and some monitors radiate noise. Turn off culprits or move the guitar position to a quieter angle.
Signal path and DI level for clean capture
Even if you plan to mic an amp or run amp sims, always print a clean, full bandwidth DI. This protects you against tone changes later and gives you re-amp flexibility without retracking. Keep the DI dynamic and healthy rather than hot.
- Target digital peaks: around -12 to -6 dBFS on hard accents. If you are hitting 0 dBFS at any point, lower the input. Consistency beats loudness at this stage.
- Impedance: Use an interface or DI box that presents a high impedance input so your tone does not dull. Many instruments prefer 1 MΩ or higher.
- Noise floor: With the guitar volume down, check your meters. If hiss hum or radio appears, fix it before you play. It is faster than editing later.
When you want the freedom to audition heads, pedals and cabs after editing, line up a reliable re-amping path. A solid DI and re-amp workflow lets you keep performances and chase tone without risk.
Editing readiness and performance consistency
Clean edits start with consistent picking and controlled palm mutes. Decide the part variants in pre production, then record with click and arrangement cues so comping is fast and invisible.
- Pick choice and angle: Harder plastics and a slightly flatter angle reduce scrape. Keep the angle constant on doubles so tones match.
- Left hand muting: Cleanly release between phrases to lower spill into high gain sections. Treat silences as part of the performance.
- Grid honesty: Track with the final tempo map, then nudge only what distracts. If tightening work steals hours from creative time, book guitar editing so you can focus on takes.
Room, amp and monitoring checks
For mic’d tones, keep the room free of rattles, isolate sympathetic objects, and keep headphone bleed reasonable so high gain parts stay tight. For amp sims, disable any duplicate cab blocks if you are using third party IRs to avoid layered filtering that smears transients.
- Cab position: Avoid corners that hype lows. A small pull from the wall often tightens response.
- Mic discipline: Photograph positions and name files sensibly so recalls are exact later.
- Monitoring level: Work at a sensible volume so you judge pick attack and low mid build honestly. Loud enough to hear sustain, quiet enough to avoid fatigue.
Pre production that pays off on tracking day
Map intros, interludes and transitions, confirm tempo changes, and test harmonies before the clock runs. Pre production demos reveal hand synchronisation issues and string noise long before you chase them in the live room.
If you want a quick sanity check from an outside ear, a short round of pre production demos tightens arrangement and tone direction before you commit studio time.
Deliverables that future proof the project
- Always export the clean DI for every guitar performance, full length with a short count if used.
- Print processed tracks for the chosen tone, plus any alternate takes you may want to revisit.
- Document settings for action, relief, pickup heights, string brand and gauge, IR names, mic positions. Screenshots help recalls.
- Keep sessions tidy with labelled playlists or takes folders so comp decisions are transparent to collaborators.
Fast checklist before you press record
- Strings fresh, stretched, in tune after strong bends.
- Relief 0.10 to 0.30 mm, action 1.2 to 2.2 mm range confirmed at the 12th.
- Intonation checked at the 12th and across chord shapes.
- Pickups balanced around 1.5 to 3.0 mm from strings when fretted at last fret.
- Tremolo set float or decked, returns to pitch after dives.
- Electronics quiet, cables solid, no ground loop hum.
- DI level peaking -12 to -6 dBFS on accents, no clipping.
- Project folder ready for clean DI plus tone prints and notes.
Helpful services and next steps
If you want your session to run like clockwork, combine a clean capture plan with a re-amp safety net and a tight editing workflow. Start with clean DI capture and tightening, keep options open with re-amping for tonal shootouts, and book editing support when deadlines are tight. If you need your songs benchmarked against your favourite references before mastering, lean on reference track and tone matching to remove guesswork.
FAQ: prepare your guitar like a pro
How often should I change strings before recording
Change them the day you track or the evening before. Stretch, retune, and let the guitar settle. If you record across multiple days, plan a fresh set per day for consistent tone, especially on high gain material where top end detail matters.
What relief and action should I aim for
A practical target is around 0.10 to 0.30 mm of relief measured at the 7th to 9th fret, with action at the 12th roughly 1.2 to 1.8 mm on the treble E and 1.6 to 2.2 mm on the bass E. Treat these as starting points and adjust for touch and tuning.
Do I need to record a clean DI if I love my amp
Yes. A DI is an insurance policy that lets you re-amp later and audition cabs or sims without asking the player to retrack. It also accelerates editing and keeps timing decisions independent from tone choices.
How loud should my DI be into the DAW
Aim for healthy peaks around -12 to -6 dBFS on strong accents with no clipping. This leaves headroom for transients and ensures re-amp devices and amp sims behave naturally when you push them later.
My single coils hum in the studio what can I do
Reduce environmental noise, rotate your position to find a quiet angle, keep cables short and healthy, and check for ground loop problems in the rig. If time is tight, track with minimal gain and add character later using re-amp or sims so noise stays manageable.